Keyvan's Notes2024-11-20T22:38:04.491Zhttp://keyvanfatehi.com/Keyvan FatehiHexoHow to configure systemd service crash digest email alertshttp://keyvanfatehi.com/2024/11/20/How-to-configure-systemd-service-crash-digest-email-alerts/2024-11-20T14:31:11.000Z2024-11-20T22:38:04.491ZBy default, systemd does not notify you when a service crashes. However, you can use the ExecStopPost directive to trigger a command when a service stops, including after a crash.
The problem with this approach is that frequent crashes can result in a large number of individual emails, which can be overwhelming. To address this, I’ve created systemd-crash-digest which accumulates crash notifications in a file and sends a single email digest at configurable intervals, reducing email overload while still providing essential failure summaries.
]]><p>By default, systemd does not notify you when a service crashes. However, you can use the <code>ExecStopPost</code> directive to trigger aDocker wordpress SSL fixhttp://keyvanfatehi.com/2024/01/21/wordpress-ssl-fix/2024-01-21T09:47:26.000Z2024-11-20T22:38:04.503ZFixes an issue where wordpress does not realize you’ve already got SSL resulting in a redirect loop.
1
2
3
4
// Needed this to get SSL working properly... https://blog.ldev.app/running-wordpress-behind-ssl-and-nginx-reverse-proxy/
if (isset($_SERVER['HTTP_X_FORWARDED_PROTO']) && $_SERVER['HTTP_X_FORWARDED_PROTO'] === 'https') {
        $_SERVER['HTTPS'] = 'on';
}
]]><p>Fixes an issue where wordpress does not realize you’ve already got SSL resulting in a redirect loop.</p>
<figure class="highlight php"><tHow to script RouterOS to failover primary WAN in a Mikrotik routerhttp://keyvanfatehi.com/2023/11/18/Mikrotik-RouterOS-Basic-Failover/2023-11-18T22:34:45.000Z2024-11-20T22:38:04.495ZInspired by https://rickfreyconsulting.com/basic-failover-with-netwatch/
1
2
3
4
5
6
7
8
9
10
11
12
13
14
15
16
17
# Prerequisites: # - Have a primary WAN ethernet interface, e.g.: ether1. # - Have a DHCP client on that interface commented as "WAN1" # /ip dhcp-client add comment=WAN1 interface=ether1 # - Have a static route using the primary network gateway with comment "ToCheckWAN1" and ping target 1.1.1.1 # /ip route add distance=1 dst-address=1.1.1.1 gateway=192.168.1.1 comment=ToCheckWAN1
:local pingResult [/tool ping 1.1.1.1 interface="ether1"count=1] :local currentDistance [/ip dhcp-client get [findcomment=WAN1] default-route-distance] :if (($pingResult != 0) and ($currentDistance != 1)) do={ /ip dhcp-client set [findcomment=WAN1] default-route-distance=1 :loginfo"ether1 is now primary." } :if (($pingResult = 0) and ($currentDistance != 10)) do={ /ip dhcp-client set [findcomment=WAN1] default-route-distance=10 :loginfo"ether1 is now secondary." }
Install this script in the router and use the scheduler to run it as frequently as you wish.
It will automatically keep your router online by distancing the route of the primary, allowing your secondary to take over routing.
Upon return, your primary will have the route distance reduced, thus taking over from the secondary.
]]>Keeping your network online when your primary WAN goes offlineHow to configure nginx stream proxy to route traffic based on subdomain to different upstream backendshttp://keyvanfatehi.com/2023/08/17/How-to-use-ngx-stream-ssl-preread-module-for-A-B-testing-by-subdomain/2023-08-17T10:43:34.000Z2024-11-20T22:38:04.491ZLab notes.
Scenario: We have two backend webservers powering our website via nginx. We have some risky new feature we want to rollout.
Can we know which subdomain is being used, and choose a specific backend just for that subdomain?
ports = range(8001, 8005) threads = [Thread(target=create_app, args=(port,)) for port in ports]
for thread in threads: thread.start()
for thread in threads: thread.join()
This will listen on ports 8001 to 8004 and reply with subdomain and port number as it sees it.
It’ll be useful to know if our rules worked.
After using acme.sh to get a cert quickly for our domain, we can customize the nginx conf to wrap our backend service with SSL, and then use our stream proxy with this subdomain selection mechanism that we are testing:
Finally let’s create the backends.map file (this could be named anything except that it cannot end in .conf, otherwise nginx will try to parse directives and thus error out since this is merely a way to externalize the map to its own file for easy editing without affecting the rest of the config.)
]]><p>Lab notes.</p>
<p>Scenario: We have two backend webservers powering our website via nginx. We have some risky new feature we want to rollHow to run exe on Windows as a service with nssm.exehttp://keyvanfatehi.com/2023/04/16/How-to-run-SecurePut-on-Windows-as-a-Log-on-service-with-nssm-exe/2023-04-16T19:45:09.000Z2024-11-20T22:38:04.491ZNote: this solution ultimately failed to meet the requirement of being able to type text from the service onto the active desktop, but remains here as an example usage of nssm.exe – I successfully used it to turn telegraf.exe into a service, which does not require the Log On feature at all, so it’s even simpler.
Last year I created secureput.com, although I never wrote about it on this website, to stop typing in the same long passwords over and over.
In my Windows version, which is written in Go, and has an installer, I still could not streamline the creation of a service and eventually ran out of steam to keep hacking on it. It was easier just to put a shortcut in shell:startup and call it a day.
This is okay but not ideal because:
it pops open a terminal as of windows 11’s new default terminal program which does not yet support the api’s that were standard in the old version. this can be worked around by running the old terminal but it’s an ugly trick and unnecessary in the context of using a service instead. it also makes the icon look ugly.
this will not auto-restart in the event of a crash, so no supervision tree feature. secureput could crash due to being so experimental, it really wants to be a service.
Before servicifying secureput, be sure to run it at least once directly so that you can perform the pairing process. This is not possible in service mode!
Get it and put it somewhere on your computer and update your PATH variable so it is available.
Create a service
Open an admin shell (Search->Powershell->Run As Administrator)
Enter nssm install SecurePut
Click the ellipses and choose the EXE file:
Click the “Log on” tab. SecurePut requires this because it interacts with the desktop
Click “Install Service” and get a confirmation popup
Start the service: nssm start SecurePut
Now check your mobile app, and you should see your host.
Now for some unknown reason I cannot actually have SecurePut perform its main duty of typing in text for me, so I have to back out of this idea, but at least the above serves as an example of using nssm.
]]><p>Note: this solution ultimately failed to meet the requirement of being able to type text from the service onto the active desktop, but reHow to customize telegraf postgresql output plugin for timescaledbhttp://keyvanfatehi.com/2023/04/16/How-to-customize-telegraf-postgresql-output-plugin-for-timescaledb/2023-04-16T18:53:55.000Z2024-11-20T22:38:04.491ZIn the telegraf.conf file we can see the following snippet commented out
1 2 3 4
## Templated statements to execute when creating a new table. create_templates = [ '''CREATE TABLE {{ .table }} ({{ .columns }})''', ]
We can alter this to fit a timescaledb setup like so:
1 2 3 4 5 6 7 8
## Templated statements to execute when creating a new table. create_templates = [ ''' CREATE TABLE {{ .table }} ({{ .columns }}) SELECT create_hypertable('{{ .table }}', 'time'); SELECT add_retention_policy('{{ .table }}', INTERVAL '2 weeks'); ''', ]
Full Example
Here is what I am using on windows to send my nvidia gpu metrics:
]]><p>In the telegraf.conf file we can see the following snippet commented out</p>
<figure class="highlight plaintext"><table><tr><td class="guHow to install NVIDIA drivers and specific CUDA versions on Ubuntu 22.04 Server (not Docker)http://keyvanfatehi.com/2023/04/09/How-to-Install-NVIDIA-Drivers-and-CUDA-on-Ubuntu-22-04/2023-04-09T20:27:52.000Z2024-11-20T22:38:04.487ZAfter installing Ubuntu 22.04 server for AI research purposes using Nvidia GPU(s), the first thing you must do is get your GPU working.
As of this writing, you want to view the official Nvidia cuda installation guide:
Use that and avoid installing the default ubuntu versions of the drivers. It is very outdated and the cuda it ships is incompatible with the driver it ships. The solution is to use the official nvidia ubuntu repos as described in the link above.
As of this writing, this script captures the essence of what the guide dictates:
# Update the package list to include the new repository sudo apt update
# Install the latest compatible NVIDIA driver and CUDA Toolkit sudo apt install cuda-11-7
# now i dont have nvcc # run nvidia-smi and confirm cuda version in the top right. # Check if nvcc is in the folder /usr/local/cuda-11.7/bin Run ./nvcc --version if it exists in that folder # If this is the case, add the folder to your global path variable echo "export PATH=/usr/local/cuda-11.7/bin${PATH:+:${PATH}}" >> ~/.profile
After rebooting, check nvidia-smi and nvcc commands are available.
]]>After installing Ubuntu 22.04 server for AI research purposes using Nvidia GPU(s), the first thing you must do is get your GPU working.How to identify tables in TimescaleDB that aren't optimized for performancehttp://keyvanfatehi.com/2023/02/22/Query-to-find-non-hypertable-tables-in-TimescaleDB/2023-02-22T16:11:20.000Z2024-11-20T22:38:04.495ZHere is an easy to use query to reveal the tables which are not taking advantage of the special features of TimescaleDB, specifically retention policies, automatic moving, and high performance chunking.
SELECT pg_size_pretty(pg_total_relation_size(pt.relid)), pt.relname, ht.hypertable_name from pg_catalog.pg_statio_user_tables pt LEFTJOIN timescaledb_information.hypertables ht ON pt.relname = ht.hypertable_name WHERE pt.relname NOTLIKE'_hyper_%_chunk'-- Filter out the underlying hypertable chunks -- AND ht.hypertable_name ISNULL-- Select those who are lacking a hypertable so we know what we need to create-- orderby pg_total_relation_size(pt.relid) desc limit 20;
At this point you can use the truncation method to quickly make them into hypertables, e.g.:
]]>Use this simple SQL query to quickly identify tables in TimescaleDB that aren't using features like retention policies, automatic moving, and high-performance chunking to their full potential.Building a spoofed custom Dell Power Supply for the Comma Body external PChttp://keyvanfatehi.com/2023/01/25/Building-a-Dell-Power-Supply-for-the-Comma-Body-external-PC/2023-01-25T19:04:24.000Z2024-11-20T22:38:04.455ZIn this blog post, we will be discussing how to spoof a Dell power supply using an Adafruit Trinket. Dell laptops use a 1-Wire-based supply identification protocol, which can be easily spoofed using the Trinket. The Trinket can drop the 12v input to 5v to power itself and also turn on the power to the miniPC once the spoof is ready.
The first step in the process is to drop the 12v input to 5v to power the Adafruit Trinket.
Step 2: Spoofing the Dell Power Supply
The Trinket is then used to spoof the Dell power supply’s 1-Wire-based identification protocol. The Trinket is programmed to emulate a DS2502 - 1kbit EEPROM, which is used by Dell laptops to identify the power supply.
Step 3: Turning on the Power to the miniPC
Once the spoof is ready, the Trinket turns on the power to the miniPC. This is done by connecting the Trinket to the main power button of the miniPC. The power is then supplied to the miniPC, and it can be used as normal.
]]><p>In this blog post, we will be discussing how to spoof a Dell power supply using an Adafruit Trinket. Dell laptops use a 1-Wire-based suppComma Body external PC direct ethernet networkinghttp://keyvanfatehi.com/2023/01/15/Comma-Body-external-PC-direct-ethernet-networking/2023-01-15T17:28:35.000Z2024-11-20T22:38:04.475ZLately I have been working on the comma body, specifically merging it with a small but capable PC for the purpose of unlocking webrtc streaming and other features.
This is fine but I realized with a bit more effort we could eliminate the router, reducing complexity and maybe improving latency further. Notice the much cleaner look too:
This guide sparked a more sophisticated bit of tooling which can be found https://github.com/kfatehi/comma-body-hacks but the following techniques apply to linux machines in general and so it is worth publishing before further pigeonholing it into highly customized scripts. Hope you find the information in a random google search and it helps you!
Utilizing Comma Prime to SSH into a computer physically connected via direct ethernet cable
]]><p>Lately I have been working on the comma body, specifically merging it with a small but capable PC for the purpose of unlocking webrtc strReporting on Postgres Long Querieshttp://keyvanfatehi.com/2023/01/13/Reporting-on-Postgres-Long-Queries/2023-01-13T11:04:42.000Z2024-11-20T22:38:04.495ZIn Tracking long-running postgresql queries we learned how to extract long queries. The technique used means that a long query will be printed repeatedly, but we are only interested in the last report. I used ChatGPT to ask for what I wanted and it provided the following script.
# Create an empty associative array to store the ages for each pid declare -A pids
# Read the file line by line whileread line; do # Extract the pid and age from the line using regular expressions pid=$(echo$line | grep -oP '(?<=pid:)[0-9]+') age=$(echo$line | grep -oP '(?<=age:)[0-9:]+') # Check if the pid and age are valid if [ -z "$pid" ] || [ -z "$age" ]; then continue fi
# Convert the age string to seconds age_seconds=$(date -ud "$age" +%s)
# If the pid already exists in the array, check if the current age is greater than the stored age if [ -v pids[$pid] ]; then if [ $age_seconds -gt ${pids[$pid]} ]; then pids[$pid]=$age_seconds fi else # If the pid does not exist in the array, add it with the current age pids[$pid]=$age_seconds fi done < report_long_queries.txt
for pid in $(printf'%s\n'"${!pids[@]}" | sort -nr); do echo"PID: $pid, Age: $(date -ud "@${pids[$pid]}" +%T)" done
]]><p>In <a href="/2022/12/27/Tracking-long-running-postgresql-queries/" title="Tracking long-running postgresql queries">Tracking long-runningTracking long-running postgresql querieshttp://keyvanfatehi.com/2022/12/27/Tracking-long-running-postgresql-queries/2022-12-27T15:14:56.000Z2024-11-20T22:38:04.499ZLast time we learned how to add comments to our SQL queries. This helps tie logged queries back to code. But to truly achieve this goal have to solve two more problems: the exfiltration of long running queries and the injection of a unique identifier that maps to our workloads’ code paths:
exfiltration Postgres will not log a query for which the client unexpectedly disconnects. Even if a query runs for a very long time, it may not be logged at all. There may be other situations in which these important queries are lost to the ether, so we must detect and save them before this happens.
To be honest, logging long-running queries seems via cron does seem like the most KISS solution to me:
psql -tc "select now() as t, pid, usename, query from pg_stat_activity where state != 'idle'" > /tmp/pg.running.txt Then you can spot the queries that stay there for several hours and run EXPLAIN on them.
This means we will end up creating a separate log file so we should think about how to organize this information so that it’s useful and not overwhelming. To this point, I think long running queries should instead be dumped into the default log file occasionally, so that operators can grep the same log file, except that now it will be more enriched.
We need to decide upon what frequency to invoke the check. I think 1 minute is fine, that’s too long for a database query. If something is running for a long time it will get printed over and over, once every minute.
We do not want to see active queries that are faster than 1 minute, which happen to be active at the time of the check, so we’ll make sure to only log queries whose runtime is exceeding 1 minute.
Finally I would like to avoid using an external program and do this all within postgres, this way we can use the existing logging functions and keep things self-contained.
injection How and what to inject into the queries for your app. When we learned How to trace postgresql database SQL queries we did not determine how to do it from a conventional web application. Nor did we determine exactly what to inject. i. How: let’s create a solution compatible with the default ActiveRecord postgres driver used in Ruby on Rails to automatically insert a SQL comment on every query. There is some precedent, e.g. Rails 6 saw the addition of the annotate method which injects a SQL comment into a query. We are looking for an automated solution, however, since our app has a lot of queries and we do not wish to edit all (any) of them. ii. What: let’s assume there is some global variable in memory (e.g. set by some other part of the Rails application, such as Rack or Sidekiq.) containing a unique identifier and whether or not this is a web request. It would be great if we could know what line number this query originated from as well, but sticking an entire call stack into a SQL comment seems garish. Let’s consider options around this lastly as a finishing garnish.
1. Solving the exfiltration problem
Nowadays we can chat with ChatGPT to get a jumpstart on unfamiliar problem-spaces. It did not disappoint in producing a solution. Note that this solution uses the internal pg_cron extension, so I am adding the steps and then we’ll get into installing and using ChatGPT’s solution. Let’s begin:
Create Dockerfile
1 2 3 4
FROM postgres:15.1-bullseye RUN apt-get update && apt-get -y install git build-essential postgresql-server-dev-15 RUN git clone https://github.com/citusdata/pg_cron.git RUNcd pg_cron && make && make install
Build it. Note I tried to use postgres:11 but apt was broken there, so we’ll be using postgres 15. Depending on when you’re reading this, you may have the same issue with postgres 15, and maybe bumping the versions will work for you too, future person.
1
docker build -t pgwcron .
Create postgresql.conf
1 2 3 4 5 6 7 8 9 10 11 12 13
listen_addresses = '*'
# Read about pg_cron and how to set it up and use it on # CitusData's pg_cron repo: https://github.com/citusdata/pg_cron
# required to load pg_cron background worker on start-up shared_preload_libraries = 'pg_cron'
# optionally, specify the database in which the pg_cron background worker should run (defaults to postgres) cron.database_name = 'postgres'
# optionally, specify the timezone in which the pg_cron background worker should run (defaults to GMT). E.g: cron.timezone = 'GMT'
Start the server
1
docker run --rm --nametrace-postgres-v$PWD/postgresql.conf:/etc/postgresql/postgresql.conf -e POSTGRES_PASSWORD=pass pgwcron -c'config_file=/etc/postgresql/postgresql.conf'
Install the pg_cron extension by executing the following SQL statement:
1
CREATE EXTENSION pg_cron;
And now we can use ChatGPT’s solution. Note that I had to fix some small errors it made, so the solution you see here is tested working:
This function will use the RAISE NOTICE statement to output a message for each active query in the pg_stat_activity view that has been running for more than 1 minute, with the current timestamp, process ID, username, and query text. These messages will be written to the PostgreSQL log file, which is specified in the log_destination configuration parameter in the postgresql.conf file.
1 2 3 4 5 6 7 8 9 10 11 12 13 14 15
CREATEOR REPLACE FUNCTION log_active_queries() RETURNS void AS $BODY$ DECLARE query record; BEGIN FOR query INSELECT*FROM pg_stat_activity WHERE state !='idle'AND age(now(), query_start) >INTERVAL'1 minute' LOOP RAISE NOTICE 'Active queries as of % at pid %: %', now(), query.pid, query.query; END LOOP; END; $BODY$ LANGUAGE plpgsql;
To schedule this modified function to run every minute, you can use the pg_cron extension as follows:
To stop a scheduled job that was created using the pg_cron extension, you can use the cron.unschedule function as follows:
1
SELECT cron.unschedule('log_active_queries');
Now let’s create some long running jobs with annotations and see if it gets logged. I will run this a few times simultaneously using multiple terminal shells.
Looks like it works! In our logs we can see the long running query along with its tracer comment:
1 2 3
NOTICE: Active queries as of 2022-12-28 01:18:00.057665+00 at pid 114: SELECT pg_sleep(120) /* Hello */; NOTICE: Active queries as of 2022-12-28 01:18:00.057665+00 at pid 121: SELECT pg_sleep(320) /* Hello */; NOTICE: Active queries as of 2022-12-28 01:18:00.057665+00 at pid 128: SELECT pg_sleep(620) /* Hell3o */;
We should want to improve the function now to show possibly other columns from pg_stat_activity which might be useful, or any other changes. But let’s move on from here having proved this approach.
2. Solving the injection problem (from Rails)
Here is a clean monkey patch which annotates SQL queries executed by the PG::Connection class (the underlying connection used by ActiveRecord):
Create sqlannotator.rb in config/initializers
1 2 3 4 5 6 7 8 9 10 11 12 13 14 15 16 17 18 19
# https://blog.daveallie.com/clean-monkey-patching modulePGConnectionAnnotationExt moduleSQLAnnotator def self.annotate(sql) # Customize the SQL comment to contain your trace identifier. sql += "/* My Annotation */" end end
defasync_exec(sql, *params) super(SQLAnnotator.annotate(sql), *params) end
defexec(sql, *params) super(SQLAnnotator.annotate(sql), *params) end end
PG::Connection.prepend(PGConnectionAnnotationExt)
To test it, perform any SQL query, or directly use the connection instance like so:
1
2
3
4
5
ActiveRecord::Base.connection.raw_connection.async_exec("SELECT now();") # or ActiveRecord::Base.connection.execute("SELECT now();") # or, if you have a model you can use: User.all
This works! You can emulate a lockup situation easily like so, and then check if it’s being logged.
open up a rails database console shell and explicitly lock your table:
1 2
BEGIN; LOCK TABLE users;
leave that open, and open a rails console and run
1
User.all
It should get stuck…
Now go look at your logs, or use the psql shell to check pg_stat_activity:
1 2 3 4 5 6
app=# select pid,query from pg_stat_activity where state = 'active'; pid | query -----+---------------------------------------------------------------- 327 | select pid,query from pg_stat_activity where state = 'active'; 333 | SELECT "users".* FROM "users"/* My Annotation */ (2 rows)
There’s our annotation! We’re done. Just one more thing and that’s cleaning up this mess.
At this point I wanted to cancel the queries and found a nice answer from Andong Zhan was helpful:
What I did is first check what are the running processes by
1
SELECT*FROM pg_stat_activity WHERE state ='active';
Find the process you want to kill, then type:
1
SELECT pg_cancel_backend(<pid of the process>)
This basically “starts” a request to terminate gracefully, which may be satisfied after some time, though the query comes back immediately.
]]>automatic logging of long running queries and the automatic injection of a tracer comment into every Rails ActiveRecord queryHow to trace postgresql database SQL querieshttp://keyvanfatehi.com/2022/12/22/How-to-trace-postgresql-database-SQL-queries/2022-12-22T03:43:42.000Z2024-11-20T22:38:04.491Zlet’s use docker to quickly prove the concept of sending arbitrary trace strings into our postgres logs.
this is an idea suggested to me by buu in the postgres IRC channel (thanks). let’s prove it step by step:
get the image
1
docker pull postgres:11
get a config file
1
docker run --rm -it postgres:11 cat /usr/share/postgresql/postgresql.conf.sample > postgresql.conf
customize the config file
focus on the sections talking about logs and ignore the rest.
primarily, we want to set log_statement = 'all' as that is what ensures our queries are printed
PostgreSQL init process complete; ready for start up.
2022-12-22 04:42:34.949 GMT [1] LOG: listening on IPv4 address "0.0.0.0", port 5432 2022-12-22 04:42:34.949 GMT [1] LOG: listening on IPv6 address "::", port 5432 2022-12-22 04:42:34.951 GMT [1] LOG: listening on Unix socket "/var/run/postgresql/.s.PGSQL.5432" 2022-12-22 04:42:34.959 GMT [67] LOG: database system was shut down at 2022-12-22 04:42:34 GMT 2022-12-22 04:42:34.963 GMT [1] LOG: database system is ready to accept connections
send the query again, this time include a comment (for example, a request ID, or a job ID, whatever you want to bring in from the application space to help you in future endeavors)
Thus it appears that it is possible. All that remains is to facilitate injection of a smart identifier into query interface on the application’s postgres client.
Further questions…
What other traceability elements need to be switched on in the configuration for investigative pictures to be more complete?
Will this be helpful for investigating the root cause of rollbacks and deadlocks?
What are the logging nuances of rollbacks and deadlocks?
How can we reduce the noise by using the slow logger when integrating traceability while still retaining the ability to investigate postgres logs effectively?
]]>testing the embedding of tracer comments within postgres queriesIn praise of observationhttp://keyvanfatehi.com/2022/06/29/IoT-is-dead-Long-live-IoT/2022-06-29T06:03:52.000Z2024-11-20T22:38:04.491ZOne of the things that kept me relevant enough to retain gainful employment well into my old age, lack of “hustle” for the “paper chase” and all around disillusionment with life and technology, stems from work I’ve done with small electronics for the purpose of capturing metrics about our reality (“IoT”).
All around us, every moment, we miss out on potential to know the truth now and in the future. We have so much richness all around us that we think this is fine and normal, to capture even a fraction of it is hard to imagine. Our vision for example, can only capture a small fovea at some frequency that we reproduce in video in terms of frames per second… capture all of it and you don’t get an emergent pattern, you get the product of a fully exposed aperture: pure washout due to overabundance of information causing clipping in the sensors.
Nevertheless, where it makes sense, we have the means to capture data and the ability to capture that which is otherwise left to oblivion (even photography falls under this, following my previous example, and it could be part of what makes instagram so appealing as compared to twitter, the trash heap of the internet) is like magic.
NASA’s New Horizons might just be my favorite IoT device in the universe.
Enjoying the aesthetic and beauty of a photograph on your phone, or the immersion of a 6-DoF VR experience in a photogrammetrically captured environment, are great examples of creating future value through the capture of that which is otherwise ephemeral. There is beauty in automated feedback-loop control systems, or the manual work of a designer making important decisions based on observed patterns of data, using tools like linear regression to be prepared.
If IoT wasn’t such a security problem, I’d probably never have quit, but I’ve written about how dwelling on security issues is paralyzing in a bad way. Especially for me, because I see connected sensors as an important substrate (or overlay) to my other real-world projects. Not all sensors exist or are affordable, of course, and so we make up for it with failure, collecting those experiences in our brains. Since IoT is inherently less secure than no IoT, when being ultra-conservative I tend to throw the baby out with the bathwater. A better idea is to raise the baby well, with good security posture in mind, and use the bathwater in the garden.
My gainful employment over the past couple years (I think I started this full-time job around September 2021) relit the spark and has kept me sharpening the tools without really realizing it so consciously. Particularly, TimescaleDB, Grafana, and Telegraf, have become as obvious as the hammer, nail, and screwdriver. The pressures (amount of data, as well as the hammering of users of the grafana dashboards) have caused me to figure out all the details of Timescale that a small operation might not need to know about: creating the right indices, setting proper retention policies, managing jobs to move to alternative hard drives by means of postgres’ tablespaces.
I’m grateful about it because if there’s any skill worth having (and that stays useful in industry), it’s knowing how to gather metrics and I don’t care if it’s about some software system, hardware system, done with a computer, or done with your eyes, pen, paper and brain.
]]><p>One of the things that kept me relevant enough to retain gainful employment well into my old age, lack of “hustle” for the “paper chase” 2011 (armv6l) Raspberry Pis can still use the default OS of the Raspberry Pi Imager while NodeJS v11 is the last armv6l precompiled binaryhttp://keyvanfatehi.com/2022/06/23/Reviving-old-Raspberry-Pi/2022-06-23T19:36:38.000Z2024-11-20T22:38:04.495ZAn old 2011 Raspberry Pi I thought was damaged turned out to be just fine. The 5v adapter went bad somehow. Funny thing is I had two Pis deployed on this circuit, and both of their adapters went bad, whereas the Pis themselves are now verified working fine. The greater mystery about the adapters and power provision remain, but I learned a few facts about the Pi as I ended up reflashing the SD cards during verification:
The default OS provided by the official Raspberry Pi Imager software still works on units this old. I still went for the “legacy” Buster lite (no desktop) image, but I first tested the Bullseye desktop version and it worked fine, albeit very slow on the 2011 model. Even the configuration settings in the Imager program, where you can set hostname, wifi, public key, etc, worked perfectly.
NodeJS does not build official armv6 binaries after version 11. If you need NodeJS on a Pi this old, use this technique:
1
curl https://nodejs.org/dist/latest-v11.x/node-v11.15.0-linux-armv6l.tar.gz | sudo tar xzvf - --strip-components=1 -C /usr/local
I ended up verifying several old raspberry pis I have salvaged from various use cases around the house, and even an old Pi Zero (very first version) verified true with statement #1 above. It, too, is an armv6l and so statement #2 is also true.
Finally, do not forget to use overlay-fs feature before leaving your Pi to operate for years on end! This will help prevent your SD card from wearing out. Here’s a discussion about that feature: https://forums.raspberrypi.com/viewtopic.php?t=294427
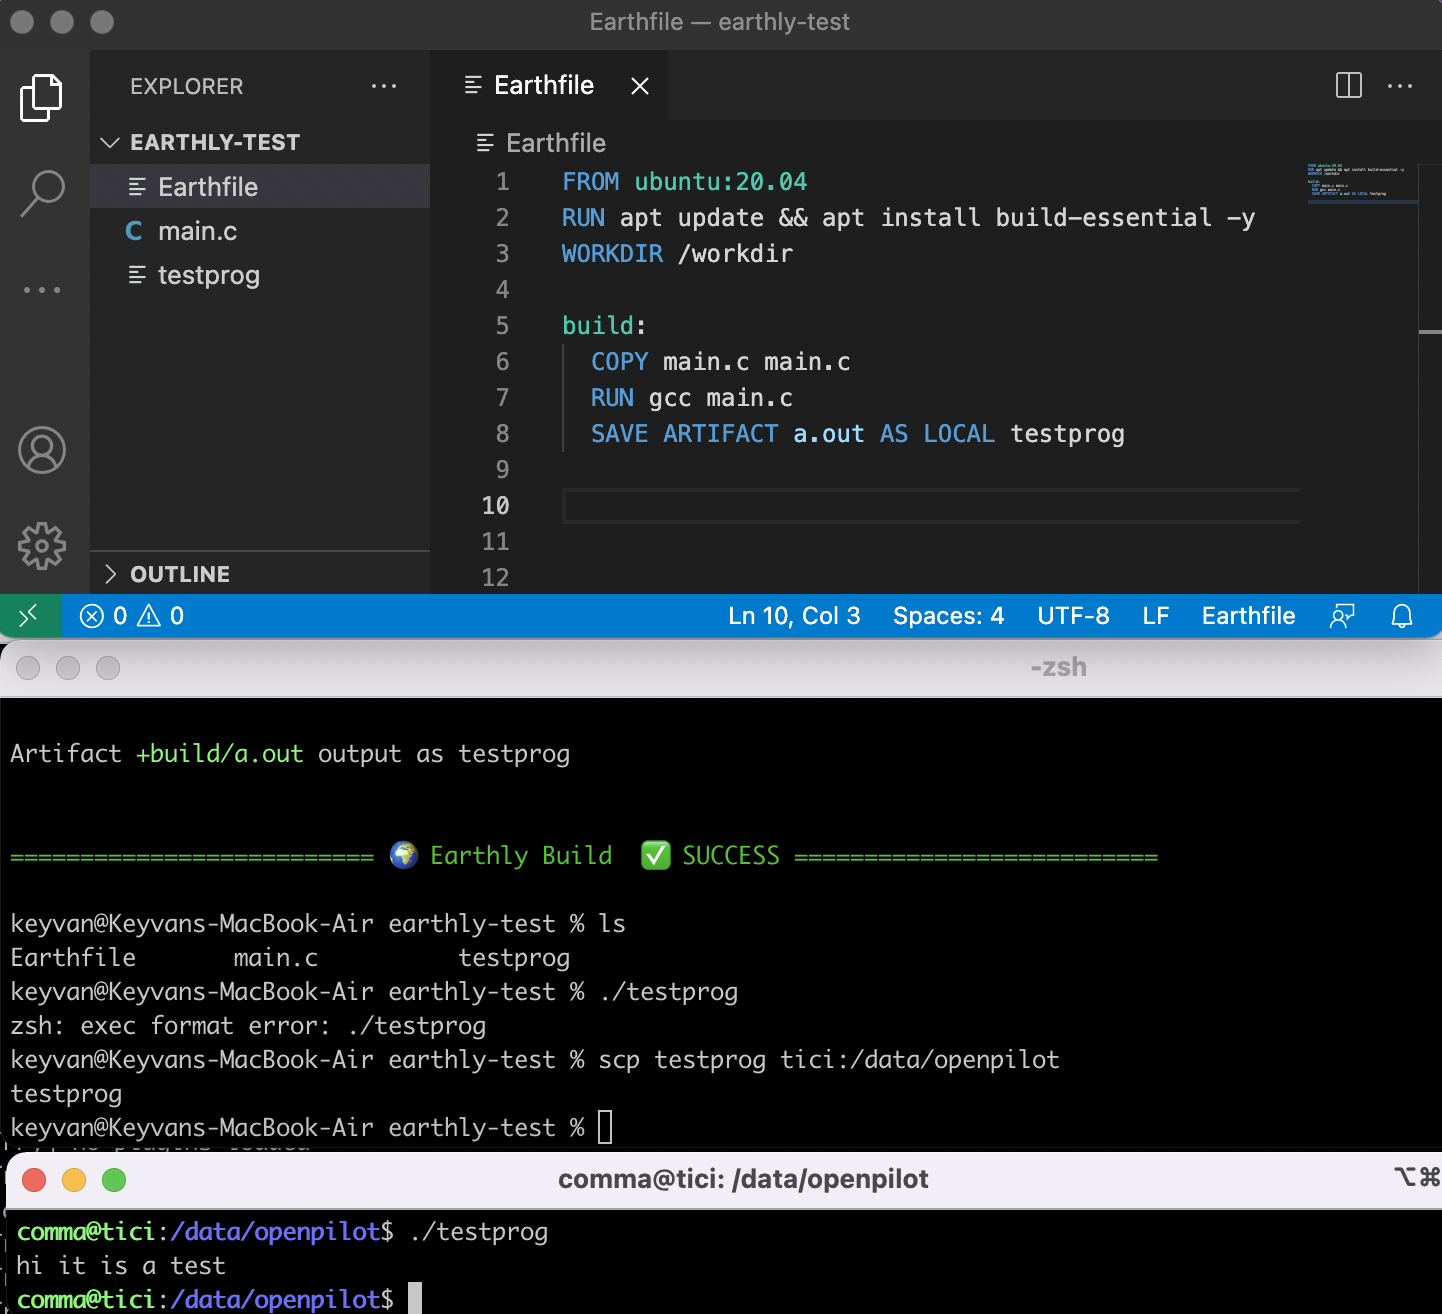
]]><p>An old 2011 Raspberry Pi I thought was damaged turned out to be just fine. The 5v adapter went bad somehow. Funny thing is I had two Pis Earthly on M1 with Docker Desktop building containerized linux/arm64 binaries that will execute on the Comma 3http://keyvanfatehi.com/2021/12/25/Earthly-on-M1-with-Docker-Desktop-building-containerized-linux-arm64-that-can-execute-on-the-Comma-3/2021-12-25T20:56:05.000Z2024-11-20T22:38:04.479ZEarthly is so useful. Native linux/arm64 builds (which will be the default when running Docker Desktop on an Apple M1 chip) can be shipped directly to and run fine on a Comma 3!
Unrelated to Earthly, I hope this PR gets merged where I push docker a bit further to make AGNOS (the ubuntu-based OS that powers the Comma 3) buildable on an M1 machine.
AGNOS usually takes a day to build with an emulated arm environment from a Ryzen 7 chip. On my M1 Air it took about 20 minutes. I think it spent more time sparsifying the final disk image than actually compiling…
]]><p><a href="https://earthly.dev/">Earthly</a> is so useful. Native linux/arm64 builds (which will be the default when running Docker DesktopLog4shell affects ElasticSearch 5 on Java 8 but not on Java 9http://keyvanfatehi.com/2021/12/21/Log4shell-affects-ElasticSearch-5-on-Java-8-but-not-Java-9/2021-12-21T23:08:54.000Z2024-11-20T22:38:04.495ZRanty Prelude
I need to see “your truth” with my own eyes before I cargo-cult your imposed commandments to perform some upgrades. If I’m vulnerable, prove it, else how will I know I solved the problem? Just keep taking your word for it, yeah?
This experience had synchrony with the disputations relating to COVID-19, specifically how we cargo-cult the vaccinations without proof of vulnerability nor proof of patching of said vulnerability. I don’t talk about politics on this site but damn this was such funny parallel it’s impossible not to point it out.
Some of us just need evidence… we need to exploit or at least see proof of exploitability, before drastic action is warranted, for the drastic action could cause undesired side effects to a system that is otherwise working fine. This is scientific. Anything else is unscientific. I am so tired of appeal to authority or majority “consensus” being considered anything but fallacious. Sadly not everyone takes Logic.
When I’m lost I turn to IRC. Here’s my nice experience sharing (extending the brainstorming beyond my team) this with #elasticsearch on libera.chat IRC
Fishing Line to Finish Line
keyvan: good afternoon. im looking for help reproducing the log4shell hack on my ES 5 instance. i have enabled slowlogger and can see my jdni-infected query in the logs, but it does not seem to call out to the external server. i have verified the external setup (im using log4shell.huntress.com) with a small example project containing only various log4j versions and it does work; but it seems elasticsearch isn’t affected? but it should be? thanks
wwalker: keyvan: does ES 5 run a new enough log4j to be affected? ES5 seems like it probably ran log4j rather than log4j-2
]]><h2 id="Ranty-Prelude"><a href="#Ranty-Prelude" class="headerlink" title="Ranty Prelude"></a>Ranty Prelude</h2><p>I need to see “your truth”iOS/iPhone Safari embedded HTML5 MP4 video ffmpeg encoder and range header server requirementshttp://keyvanfatehi.com/2021/11/28/iPhone-Safari-HTML5-video-player-is-too-picky-about-MP4-file-format/2021-11-28T15:47:24.000Z2024-11-20T22:38:04.503ZIn my previous post I tried to embed a short demo video, which reminded me of how strict Apple Safari on iOS is.
I am encoding like this now for iPhone embedding. The filter-complex is because it also appears to me that resolution must be standard, so when I crop out a strange resolution (ironically, I do this directly on an iPhone…) I seem to have to fill it back in, so that’s what this filter does, using a blur effect:
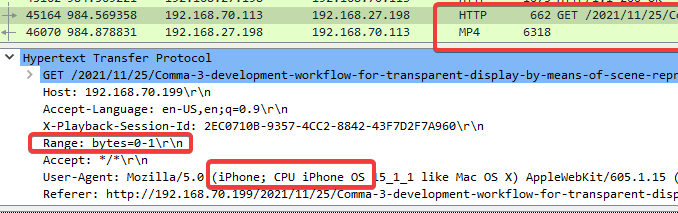
It was easy to figure out what’s going on by using wireshark to see the embedded server was disregarding Apple’s strict expectation of adherence to Range headers.
Here we see Hexo’s development server disregarding the range headers:
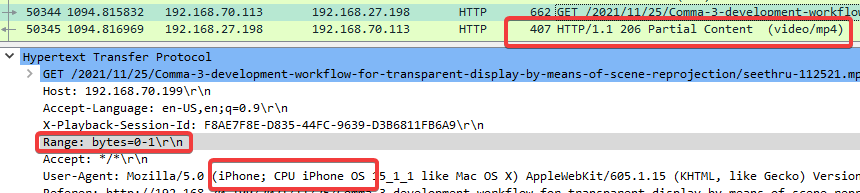
When using the http-server module we can see the range header is respected:
]]><p>In my previous post I tried to embed a short demo video, which reminded me of how strict Apple Safari on iOS is. </p>
<p><a href="https:/Comma 3 development workflow for transparent display by means of scene reprojectionhttp://keyvanfatehi.com/2021/11/25/Comma-3-development-workflow-for-transparent-display-by-means-of-scene-reprojection/2021-11-25T12:24:59.000Z2024-11-20T22:38:04.467ZOn the weekend of November 12-14 2021 I attended comma hack which was a “hackathon” (“build something in a very short period of time by means of overexertion”-marathon).
The project I wished to PoC was to see how we could use the driver monitoring model (which is used to detect the distraction level of the driver) to guide a reprojection of one of the back-facing cameras so as to achieve the illusion of transparency.
These implementations rely on depth information, but on the comma 3 platform we do not necessarily have depth data out of the box. I say it this way because there are numerous techniques to acquire depth, see comma/depth10k.
Working directly on the C3 is possible and easy to do. I will document the workflow. These days even the hardcore tmux/vim users like me are tempted into the Remote-SSH extension in VSCode, so first we’ll fix that.
The /data/media directory in the C3 is where you have persistent read-write to the large NVMe drive. I create a developer folder in there.
When I boot the C3, before I do any work, I run the following script:
The transform bit is application-specific to how I was learning about the matrix transformation. Say I want to work on that again, this is its content:
This matrix is applied to the shader and was an opportunity to manipulate the surface to which the camera was projected… I learned that these were the meanings of the fields by way of editing the transform while my program was running:
Anyway, on the C3, when it boots, everything runs in tmux. We want to stop the UI. We also want to stop updaterd because it can randomly reset our working tree.
Now is a good time to replace openpilot with a branch containing the code for this particular experiment.
You can tmux attach and Ctrl-C to kill it. Who runs tmux on boot? Systemd does, there is a service called comma that launches tmux with the launch script inside the first shell.
All services will be stopped, and now we can leverage openpilot’s interprocess communications ourselves, with purpose. Let’s block two services, and manually start the camera and driver monitoring service. Do this in different tmux windows.
BLOCK="ui,updated" ./launch_openpilot.sh
cd /data/openpilot/selfdrive/camerad && ./camerad
cd /data/openpilot/selfdrive/modeld && ./dmonitoringmodeld
Finally, our iterative command to compile and run our binary:
cd /data/openpilot/selfdrive/ui && scons -u -j4 && ./seethru
The file to hack on is openpilot/selfdrive/ui/qt/widgets/seethrucameraview.cc or view it on GitHub here
The comments I have written in seethrucameraview.cc describe the odds of pulling this off properly are low, but that is ameliorated, as far as the use case of driving in a car, by the fixed positions of the driver’s head and the c3’s mounted location. So it’s possible and probably worth continuing in order to achieve transparency through the C3’s display when driving with it.
]]><p>On the weekend of November 12-14 2021 I attended <a href="https://blog.comma.ai/comma_hack/">comma hack</a> which was a “hackathon” (“buiusing acme.sh in cloudflare dns mode to easily maintain wildcard ssl certificate for apache server on ubuntu 20.04http://keyvanfatehi.com/2021/09/11/using-acme-sh-in-cloudflare-dns-mode-to-easily-maintain-wildcard-ssl-certificate-for-apache-server-on-ubuntu-20-04/2021-09-11T20:15:36.000Z2024-11-20T22:38:04.503ZThere are many other ACME clients out there, here’s a list https://letsencrypt.org/docs/client-options/#acme-v2-compatible-clients but I like acme.sh because it saved me one day when I was desperately searching for a tool I could use without having to fumble with package managers, so we will explore some more of its capabilities now.
To take advantage of this, we must start using Cloudflare for DNS. We want to use this for a few reasons:
No need to listen on a port on a server to generate valid certs. In fact you don’t need any records in your zone at all to do this!
We want to generate wildcard certificates. Only the DNS API appears to support this feature, so we need a compatible DNS provider with an API supported by acme.sh, hence Cloudflare.
If your domain belongs to some other registrar, you can switch your nameservers over to Cloudflare.
This is important as Cloudflare’s DNS API is well-supported by acme.sh as this article will demonstrate.
This is one of three inputs required by acme.sh; in these next few steps we wish to establish these environment variables. Once you issue the cert, they will be stored in acme.sh‘s configuration for future use.
1
2
3
export CF_Token="" # API token you generated on the site. It should have Zone.DNS edit permission for at least one Zone being the domain you're generating certs for
export CF_Account_ID="" # We will get this in the next step
export CF_Zone_ID="" # We will get this in the next step
Once you have set your API token the following will help you get the remaining two. You may want to apt install -y jq if you’re pasting these commands so the JSON is parsed out for you.
1
curl -X GET "https://api.cloudflare.com/client/v4/zones" -H "Authorization: Bearer $CF_Token" | jq
If you can’t read jq selectors, you will now, as I’m showing you which key paths get you the AccountID and ZoneID below:
1
zone id: ... | jq '.result[0].id'
1
account id: ... | jq '.result[0].account.id'
Export those variables too and now you can move on to issuing the cert.
Confirm it worked by hitting the website. Did you even bother creating your A record yet? I hadn’t yet at this point. This is a nice aspect of using DNS API. It is nice not to actually need a server, yet simply show ownership of the DNS.
Pretty amazing… people used to pay a lot of money and go through a lot more hassle to get this capability. But now within minutes I have proper wildcard and naked domain encryption.
Let’s install the cron so this automatically renews.
1
0 0 * * * acme.sh --cron
Nice. We can test it with –force too, which I have done. It seems that acme will do everything per previous commands upon renewal including running your reloadcmd, e.g.:
[Sun 12 Sep 2021 02:38:25 AM UTC] Your cert is in: /root/.acme.sh/keyvan.pw/keyvan.pw.cer [Sun 12 Sep 2021 02:38:25 AM UTC] Your cert key is in: /root/.acme.sh/keyvan.pw/keyvan.pw.key [Sun 12 Sep 2021 02:38:25 AM UTC] The intermediate CA cert is in: /root/.acme.sh/keyvan.pw/ca.cer [Sun 12 Sep 2021 02:38:25 AM UTC] And the full chain certs is there: /root/.acme.sh/keyvan.pw/fullchain.cer [Sun 12 Sep 2021 02:38:26 AM UTC] Installing cert to: /etc/ssl/keyvan.pw/keyvan.pw.cer [Sun 12 Sep 2021 02:38:26 AM UTC] Installing key to: /etc/ssl/keyvan.pw/keyvan.pw.key [Sun 12 Sep 2021 02:38:26 AM UTC] Installing full chain to: /etc/ssl/keyvan.pw/fullchain.cer [Sun 12 Sep 2021 02:38:26 AM UTC] Run reload cmd: systemctl reload apache2 [Sun 12 Sep 2021 02:38:26 AM UTC] Reload success [Sun 12 Sep 2021 02:38:26 AM UTC] ===End cron===
SSL has never been so cheap, easy, and automatable…
]]><p>There are many other ACME clients out there, here’s a list <a href="https://letsencrypt.org/docs/client-options/#acme-v2-compatible-clien


 ]]>
]]>