I wanted to use Steam’s in-home streaming feature outside of my home. It turns out that you can do this via VPN. OpenVPN is relatively simple to setup in TUN mode, but TAP mode is more complicated due to bridging.
It took gathering information from a few different sources (referenced at the end of this article) to produce an up-to-date tutorial for a TAP-based VPN configuration.
Topology
This is our basic network topology, or rather, the topology we hope to configure towards:
Router & DHCP Server
IP: 192.168.1.1
DHCP Range: 192.168.1.10 to 192.168.1.237
VPN Server
IP: 192.168.1.206 (DHCP Reservation)
VPN Clients IP Range: 192.168.1.238 - 192.168.1.254
Server Setup
Install OpenVPN, bridge tools, and Easy-RSA
1 | apt-get update |
Configure Bridged Interface
Although you will see examples of bridge configurations with static addresses defined, this did not work for me. I would not be able to access the outside internet. I looked into the ubuntu wiki on bridging (see references) and discovered a configuration for a simple, dhcp based bridge. This worked best for me. Everything after bridge_ports is from a different TAP tutorial – I don’t know what they do!
1 | auto lo |
The simplest way to check this is to reboot shutdown -r now and then test if the outside internet is still accessible ping google.com and to look at the output of ifconfig.
Configure OpenVPN
Extract the example VPN server configuration into /etc/openvpn.
1 | gunzip -c /usr/share/doc/openvpn/examples/sample-config-files/server.conf.gz > /etc/openvpn/server.conf |
Open the server config, e.g. vim /etc/openvpn/server.conf
Configure the following, yours may be different depending on your topology:
1 | port 1189 |
Create the scripts that will execute when the OpenVPN service starts and stops. These scripts add and remove the OpenVPN interface to the servers br0 interface.
/etc/openvpn/down.sh
1 |
|
/etc/openvpn/up.sh
1 |
|
Make these scripts executable
1 | chmod a+x /etc/openvpn/down.sh /etc/openvpn/up.sh |
Generate the keys
Copy over the easy-rsa variables file and make the keys directory
1 | cp -r /usr/share/easy-rsa/ /etc/openvpn |
Open up /etc/openvpn/easy-rsa/vars and configure your defaults, e.g.
1 | export KEY_COUNTRY="US" |
You must also set the KEY_NAME="server", the value is referenced by the openvpn config.
Generate the Diffie-Hellman parameters
1 | openssl dhparam -out /etc/openvpn/dh2048.pem 2048 |
Now move to the easy-rsa dir, source the variables, clean the working directory and build everything:
1 | cd /etc/openvpn/easy-rsa |
Make sure that you responded positively to the prompts, otherwise the defaults are no and the key creation will not complete.
Next, move the key files over to the openvpn directory
1 | cp /etc/openvpn/easy-rsa/keys/{server.crt,server.key,ca.crt} /etc/openvpn |
You’re ready to start the server
1 | service openvpn start |
If the server is not running, look in /var/log/syslog for errors
Generate Certificates and Keys for Clients
So far we’ve installed and configured the OpenVPN server, created a Certificate Authority, and created the server’s own certificate and key. In this step, we use the server’s CA to generate certificates and keys for each client device which will be connecting to the VPN. These files will later be installed onto the client devices such as a laptop or smartphone.
To create separate authentication credentials for each device you intend to connect to the VPN, you should complete this step for each device, but change the name client1 below to something different such as client2 or iphone2. With separate credentials per device, they can later be deactivated at the server individually, if need be. The remaining examples in this tutorial will use client1 as our example client device’s name.
As we did with the server’s key, now we build one for our client1 example. You should still be working out of /etc/openvpn/easy-rsa.
1 | ./build-key client1 |
Again you need to respond positively when presented with yes or no prompts. You should not enter a challenge password.
You can repeat this section again for each client, replacing client1 with the appropriate client name throughout.
The example client configuration file should be copied to the Easy-RSA key directory too. We’ll use it as a template which will be downloaded to client devices for editing. In the copy process, we are changing the name of the example file from client.conf to client.ovpn because the .ovpn file extension is what the clients will expect to use.
1 | cp /usr/share/doc/openvpn/examples/sample-config-files/client.conf /etc/openvpn/easy-rsa/keys/client.ovpn |
Edit the client profile to reflect your server’s IP address and configure it for tap. Also be sure to replace my-server-1 with your VPN server’s IP or domain name.
/etc/openvpn/easy-rsa/keys/client.ovpn
1 | client |
Finally, you can transfer client1.crt, client1.key, client.ovpn, and ca.crt over to your client.
Create and download Tunnelblick Config (Mac only)
1 | cd /etc/openvpn/easy-rsa/keys |
Now you can scp that over to your Mac, double-click to extract, and then double-click the .tblk file to allow Tunnelblick to install the profile.
Troubleshooting
It connects, I can ping the OpenVPN server’s LAN address, but no internet or other LAN addresses.
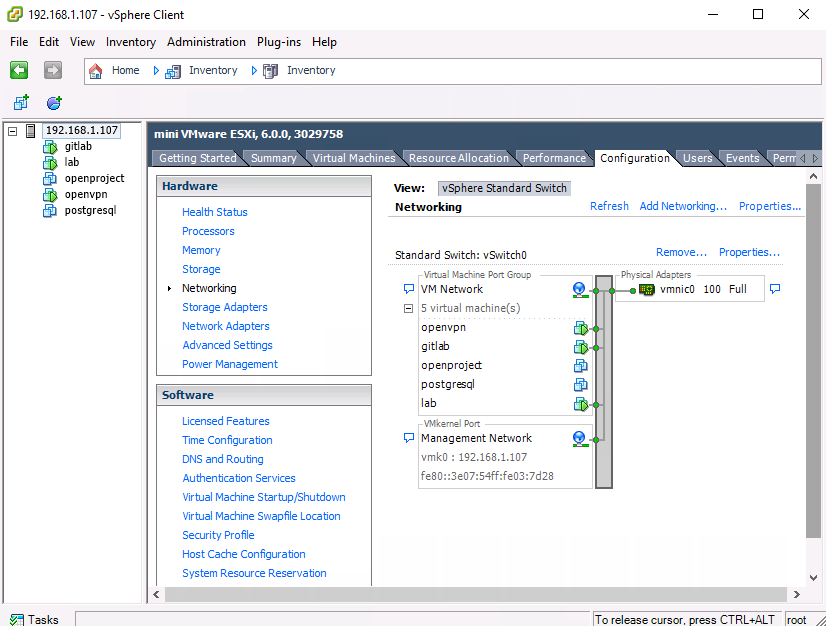
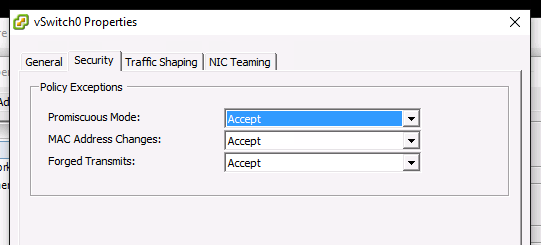
Are you running on VMWare VSphere or ESXi? If so you need to configure your switch in promiscuous mode.


It connects, I can ping LAN and internet addresses, but DNS isn’t working.
If you manually configure a DNS (e.g. 8.8.8.8), does it work? Then you can configure your openvpn server to push DNS configuration to the clients.
Add a line like this to the openvpn server config:
1 | push "dhcp-option DNS 192.168.1.1" |
References
- https://www.digitalocean.com/community/tutorials/how-to-set-up-an-openvpn-server-on-ubuntu-14-04
- https://www.linuxsysadmintutorials.com/setup-openvpn-with-bridging-support-on-ubuntu.html
- https://help.ubuntu.com/community/NetworkConnectionBridge
- http://askubuntu.com/questions/533047/use-steams-in-home-streaming-across-vpn-openvpn
- http://www.evilbox.ro/linux/install-bridged-openvpn-on-ubuntu-14-04-x64-server-and-configure-windows-8-1-x64-client/
- http://unix.stackexchange.com/questions/23004/openvpn-bridge-cant-access-machines-on-local-network
- https://community.openvpn.net/openvpn/wiki/BridgingAndRouting
- http://serverfault.com/questions/318563/how-to-push-my-own-dns-server-to-openvpn